Your Raspberry Pi doesn't come with an operating system pre-installed.
This means you can choose from a wide of OSs, each of which can be flashed to your Raspberry Pi's SD card. Here's how to get a new OS installed and running on your Raspberry Pi, using Windows, macOS, or Linux.
Choosing Your Raspberry Pi Operating System
So many operating systems are available to run on your Raspberry Pi. From the recommended Raspbian Stretch (and its Lite alternative) to Ubuntu MATE, via OSs for Kodi, RetroPie, and many other projects, via several Linux and non-Linux alternatives, the choice is massive.
Our list of operating systems for the Raspberry Pi will give you a flavor of what is available. Whichever OS you choose, be sure to download it to your PC in advance. This will be an ISO or IMG file ready to be written to your Raspberry Pi's SD card.
Flashing an Operating System to Your Raspberry Pi
To install an OS to your Raspberry Pi, you'll Etcher. This is a tool for writing disk images to flash storage, whether an SD card or a USB thumb drive. It's a simple mouse-driven app, available for Windows, Linux, and macOS.
Download: Etcher (Free)

With Etcher installed and running, you'll notice three buttons.
All you need to do is click each in turn. Begin with Select Image, then browse to your chosen operating system's ISO or IMG file. Next, click Select Drive to choose the SD card. Etcher is smart enough to detect any SD card connected to or inserted in your PC, but it's worth checking that the right one is detected.
Finally, click Flash to begin writing the data. You don't need to format the SD card as Etcher will handle this.
When done, click OK to finish, then exit Etcher. Eject the SD card, and insert it into your powered-off Raspberry Pi. Connect the power cable and wait as the computer boots the operating system.
If using Etcher to install an operating system seems difficult, why not purchase an SD card with Raspbian pre-installed? This uses the NOOBS installation system, which we'll look at below.
Raspberry Pi 32GB Preloaded (NOOBS) SD Card Raspberry Pi 32GB Preloaded (NOOBS) SD Card Buy Now On Amazon $13.00Booting Raspbian for the First Time
With Raspbian installed, you'll need to login with the following credentials:
Username: pi
Password: raspberry
For other operating systems, check the documentation to find the default login credentials.
Remember that the password will not be displayed as you type it; there are no Windows-style * symbols representing the letters. Instead, it will appear that you haven't entered a password. This is a security feature in Linux to prevent people guessing the length of your passphrase. Just type the password regardless.
Once Raspbian has booted, change your password by running:
sudo raspi-configSelect the Change Password option and follow the on-screen instructions.
Installing Operating Systems With NOOBS
For a simpler, more streamlined install of the more popular Raspberry Pi distros, you can employ NOOBS.
An acronym for the New Out Of Box Software installation system, this features Arch Linux, OpenELEC Kodi, RISC OS, and more alongside Raspbian.
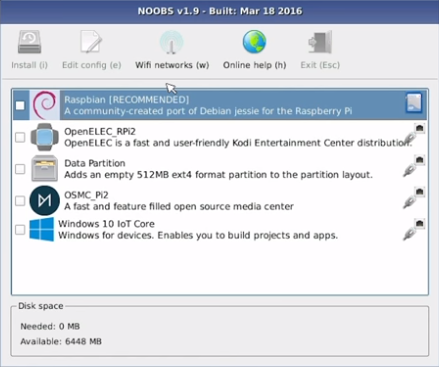
NOOBS is available from raspberrypi.org/downloads and doesn't require "writing" to SD card in the way Raspbian and other Raspberry Pi operating systems do.
You will need a formatted SD card greater than 4GB. When downloading NOOBS, note that offline and online installers are available, differing in size; the smaller download will require that your Raspberry Pi is connected to the internet via Ethernet.
A keyboard and/or mouse and HDMI display are needed to access the menu to install an OS with NOOBS.
With the Raspberry Pi booted into the NOOBS interface, you can choose your operating system(s). NOOBS isn't the only option here, however, so check our comparison of NOOBS, Berryboot, and PINN installation systems for the Raspberry Pi.
Perfecting Your Raspberry Pi OS
Different Raspberry Pi projects require a varying amount of software; it really all depends on what you're planning to do.
For instance, you might want to use your Raspberry Pi as a media center. If so, you might use NOOBS to install one of the Kodi options.
With this done, you will then need to install whatever updates are available. There may be other applications that you need, or add-ons such as Vimeo or YouTube, perhaps the TED Talk channel, etc.
As with any computer system, installing the operating system is only the first step. Updates, optional software and other tools will also need to be added before you're happy that the Raspberry Pi is ready for its intended use. The same process would be followed for whatever Raspberry Pi projects you have in mind.
Disaster Management: Cloning the OS
The point at which you're happy with the installed OS is precisely when you should make a clone of it. This like making a backup of your PC and saving the data to a hard drive. Cheaper SD cards often corrupt when disconnecting the power supply, so having a backup is a smart option.
Several tools are available for making a full backup image of your Raspberry Pi's SD card. Once the backup is made, it can be easily flashed to a different SD card following a system error.
Find out more in our comprehensive explanation of cloning your Raspberry Pi SD card.
Installing an OS on a Raspberry Pi Is Easy
One thing is clear about the Raspberry Pi: it relies on the SD card to on extent or another. As such, understanding how to use this type of media with the little computer is vital.
Writing an operating system to SD card is the Raspberry Pi equivalent of installing an operating system. As you'll have noticed, it's much quicker than installing Windows to a HDD, and with NOOBS doing the hard work, even simpler!
Not keen on relying on the SD card? Try booting your Raspberry Pi from USB.
Read the full article: How to Install an Operating System on a Raspberry Pi
via https://ift.tt/2mewCrI
No comments:
Post a Comment