Thursday, 6 December 2018

Google Play services discontinuing updates for API levels 14 and 15


Posted by Sam Spencer, Technical Program Manager, Google Play


The Android Ice Cream Sandwich (ICS) platform is seven years old and the active device count has been below 1% for some time. Consequently, we are deprecating support for ICS in future releases of Google Play services. For devices running ICS, the Google Play Store will no longer update Play Services APK beyond version 14.7.99.


What does this mean as an Application developer:


The Google Play services SDK contains the interfaces to the functionality provided by the Google Play services APK, running as background services. The functionality required by the current, released SDK versions is already present on ICS devices with Google Play services and will continue to work without change.


With the SDK version changes earlier this year, each library can be independently released and may update its own minSdkVersion. Individual libraries are not required to change based on this deprecation. Newer SDK components may continue to support API levels 14 and 15 but many will update to require the higher API level. For applications that support API level 16 or greater, you will not need to make any changes to your build. For applications that support API levels 14 or 15, you may continue to build and publish your app to devices running ICS, but you will encounter build errors when updating to newer SDK versions. The error will look like this:


Error:Execution failed for task ':app:processDebugManifest'.
> Manifest merger failed : uses-sdk:minSdkVersion 14 cannot be smaller than version 16 declared in library [com.google.android.gms:play-services-FOO:16.X.YY]
Suggestion: use tools:overrideLibrary="com.google.android.gms:play_services" to force usage


Unfortunately, the stated suggestion will not help you successfully run your app on older devices. In order to use the newer SDK, you will need to use one of the following options:


1. Target API level 16 as the minimum supported API level.


This is the recommended course of action. To discontinue support for API levels that will no longer receive Google Play services updates, simply increase the minSdkVersion value in your app's build.gradle to at least 16. If you update your app in this way and publish it to the Play Store, users of devices with less than that level of support will not be able to see or download the update. However, they will still be able to download and use the most recently published version of the app that does target their device.


A very small percentage of all Android devices are using API levels less than 16. You can read more about the current distribution of Android devices. We believe that many of these old devices are not actively being used.


If your app still has a significant number of users on older devices, you can use multiple APK support in Google Play to deliver an APK that uses Google Play services 14.7.99. This is described below.


2. Build multiple APKs to support devices with an API level less than 16.


Along with some configuration and code management, you can build multiple APKs that support different minimum API levels, with different versions of Google Play services. You can accomplish this with build variants in Gradle. First, define build flavors for legacy and newer versions of your app. For example, in your build.gradle, define two different product flavors, with two different compile dependencies for the stand-in example play-services-FOO component:


productFlavors {
legacy {
minSdkVersion 14
versionCode 1401 // Min API level 14, v01
}
current {
minSdkVersion 16
versionCode 1601 // Min API level 16, v01
}
}

dependencies {
legacyCompile 'com.google.android.gms:play-services-FOO:16.0.0'
currentCompile 'com.google.android.gms:play-services-FOO:17.0.0'
}


In the above situation, there are two product flavors being built against two different versions of play-services-FOO. This will work fine if only APIs are called that are available in the 16.0.0 library. If you need to call newer APIs made available with 17.0.0, you will have to create your own compatibility library for the newer API calls so that they are only built into the version of the application that can use them:


  1. Declare a Java interface that exposes the higher-level functionality you want to perform that is only available in current versions of Play services.
  2. Build two Android libraries that implement that interface. The "current" implementation should call the newer APIs as desired. The "legacy" implementation should no-op or otherwise act as desired with older versions of Play services. The interface should be added to both libraries.
  3. Conditionally compile each library into the app using "legacyCompile" and "currentCompile" dependencies as illustrated for play-services-FOO above.
  4. In the app's code, call through to the compatibility library whenever newer Play APIs are required.


After building a release APK for each flavor, you then publish them both to the Play Store, and the device will update with the most appropriate version for that device. Read more about multiple APK support in the Play Store.

Wednesday, 5 December 2018

Improve media and messaging app integrations with Android Auto


Posted by John Posavatz, Product Manager, Android Auto


At Google I/O this past May, we provided a sneak preview of several new media and messaging features for Android Auto. We are happy to announce that these features are now ready in our latest version of Android Auto, and we encourage you to update your Android Auto implementations to take advantage of them!


New Media Features


Several new features make it easier for users to find the media content that they're looking for. Check out the full documentation for them on our Android developer site.


Search results


After performing an Assistant-based search (e.g. "OK Google, play [artist / album / playlist / book / song / genre]"), music auto-plays as before, and in addition you can now provide your own list of categorized results. First, you'll need to declare support for onSearch() in your MediaBrowserServiceCompat implementation, and then override it. Android Auto forwards a user's search terms to this method whenever a user invokes the "Show more results" affordance.


Android Auto calls onSearch with the same Bundle of extras as the one defined for Android Auto's playFromSearch() calls. Unlike playFromSearch(), onSearch() includes a Result> that can be used to return multiple MediaItems back to Android Auto for display.


You can then categorize search results using title items. For example, music apps may include categories such as "Artists", "Albums" and "Songs".


Improved browse


Content has been "brought forward" out of the drawer, and now resides within the main view of the media screen. Within this new layout, you now have an option of either displaying your browse trees as a simple list, or you can optionally display large grids of album art / icons. We recommend using lists wherever the text description is most useful in describing content (e.g. a list of track names or podcast episodes), whereas the larger grid view is most appropriate where the album / icon aids in quick identification and selection.


To start applying content styles, you should set a global default for how your media items are displayed by applying specific constants in the BrowserRoot extras bundle returned by the onGetRoot() function. Android Auto reads the extras associated with each item in the browse tree and looks for specific constants (detailed in our documentation), and then use the presence/value of each key to add the appropriate indicator.


In order to change the default behavior for a specific node, the Content Style API supports overriding the default global hint for any browsable node's children. The same extras as above can be supplied as extras in the MediaDescription. If these extras are present, then the children of that browsable node will have the new Content Style hint.


Finally, you can organize content using title items to group media in a list. To do this, every media item in the group needs to declare an extra in their media description with the same string value, which you can localize. This value is used as the group title. You also need to pass the media items together and in the order you want them displayed.


Additional metadata icons


In both browsing and playback views, you are now able to show icons next to media items which have explicit language, have been downloaded to the user's device, and which are unplayed / partially played / completed (e.g. for audiobooks and podcasts).


Android Auto inspects extras for each item in the browse tree and looks for the specific keys for the indicators, and then uses the presence/value of each key to add the appropriate indicator.


You should add these extras to content returned by your MediaBrowse Service. "Explicit" and "Downloaded" are boolean extras (set to true to show the indicator), while "Completion State" is an integer extra set to the appropriate value. Apps should create an extras bundle that includes one or more of these keys and pass that to MediaDescription.Builder.setExtras().


Updates to Messaging


We are deprecating CarExtender, in favor of the more robust and broadly beneficial MessagingStyle API. Migrating to MessagingStyle is very straightforward, and not only extends messaging support beyond Android Auto (for example, to Google Assistant), but it also brings the following immediate benefits for Android Auto:


Group messaging


Formerly, Android Auto's support for group messages was lacking - in most cases, notifications were never shown. MessagingStyle addresses that, so that your users never miss a message.


MMS / RCS support


Android Auto only supports SMS natively through the system SMS broadcast. MessagingStyle allows support for SMS apps that themselves support RCS and MMS.


To enable your app to provide messaging service for Auto devices, your app must do the following:


  1. Build and send NotificationCompat.MessagingStyle objects that contain reply and mark-as-read Action objects.
  2. Handle replying and marking a conversation as read with a Service.
  3. Configure your manifest to indicate the app supports Android Auto.


By moving to MessagingStyle, your app will not only gain automotive support, but also gain a richer mobile notification experience including inline replying, image preview, and conversation history; all within the notification shade.


An in-depth guide to implementing (or updating to) MessagingStyle can be found in our online developer documentation.


Thanks for continuing to support Android Auto!

Tuesday, 4 December 2018

Android codelab courses are here!


Posted by Jocelyn Becker, Senior Program Manager, Google Developer Training


The Google Developers Training team recently published an updated version of our Android Developer Fundamentals course as a series of Google codelabs.


Android Developer Fundamentals course landing page


Codelabs made their debut as onsite tutorials at Google I/O in 2015, and have skyrocketed in popularity as a way for developers to learn how to use Google technologies, APIs, and SDKs. A codelab is a short, self-contained tutorial that walks you through how to do a specific task. More than 2 million users have worked through Google codelabs this year.


Our Android courses were originally intended as classroom-based courses. However, we found that many people work through the courses on their own, outside of formal teaching programs. So, when we updated the Android Developer Fundamentals course, in addition to supporting classroom-based learning, we made the material available as a sequential series of codelabs.


Android Developer Fundamentals course


The updated Android Developer Fundamentals (V2) course includes lessons on using the Room database and other Architecture Components. All the apps have been updated to reflect that the Empty Activity template in Android Studio uses ConstraintLayout, and we've updated all apps to a later version of Android Studio. For more details on the differences, see the release notes.


Advanced Android course


We've also re-published the Advanced Android Developer course as a series of codelabs. This course provides step-by-step instructions for learning about more advanced topics, and adding features to your app to improve user engagement and delight. Learn how to add maps to your apps, create custom views, use SurfaceView to draw directly to the screen, and much more.


Screenshots for apps that display a customized map marker, a customized fan controller view, and an Android hiding in the dark

Teaching materials for both courses


Android logo wearing graduation cap


If you want to teach either course in the classroom, or use it as the basis of a study jam, the complete package is still available, including slide decks, source code in GitHub, and concept guides, in addition to the step-by-step codelabs.


Monday, 3 December 2018

Instagram New CLOSE FRIEND feature/Update.

Instagram new feature update it is close friend for Insta Stories..Close Friend.

Hey guys what's up if you are a Regular Instagram user  you should  know about Instagram update a new feature named close friends.
Instagram recently updated it's some feature and also posted on Instagram official page where they share about this feature,so what is Instagram close friend feature? How close friend feature works in Instagram? What close friend Feature does in Instagram?.

If you are thinking also about this feature what is this and how it works so I am going to share with you about this feature deeply.
Instagram New CLOSE FRIEND feature/Update.
Basically that is a recent Update of Instagram and the feature is now available in every Instagram application, if you don't get this feature then you need to update your Instagram application.

You can simply do this by just going on play store and search Instagram, if you already have The app ,you will definitely get an option to update your Instagram application. 

But I don't think so that you need to update your Application because I get this feature without doing anything.

Now let's talk about this new "Close Friend"feature.


As I know about this feature this is for your insta stories. Whenever you share a story on your profile you have option to choose people who can see your story and the second option you have ,make your story public for everyone.

If you select second option everyone will be able to see your stories,but,to stop this Instagram added a new feature name 'close friends'.
Instagram New CLOSE FRIEND feature/Update.
This is not going to be a big update or something like you are thinking about it will just create a group of your favourite friends as you always do on your Facebook and on your WhatsApp also.
And after that when you add some people to your favourite list you can share your story only with your favorites / Close friends.

How to use?

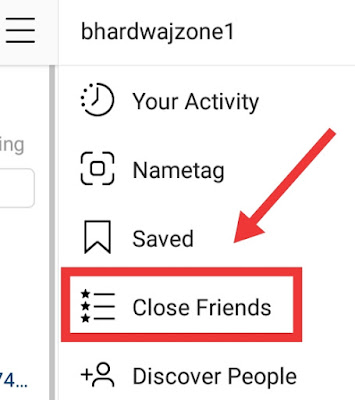
1). Just go to your profile and then select 3 lines of setting here you will get option close friends as you can see above in the image.
2). After that you will get your friends list just add your friends to favorites' who you want to show your stories.
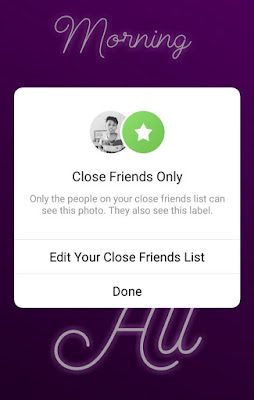
3). When you will post your story share it with your favourite. When you share your story with favourite friends story will get a label as you can see in below image.
4). Only your favourite can see your story now.
5). You can also edit this just by typing on close friend label and edit option will be there.
Instagram New CLOSE FRIEND feature/Update.
6). Don't worry nobody is going to know about your favourite friends list that you have created. Your friends can only know ''they are in it or not'.

Final Words.

This feature by Instagram is not new for me I already seen this feature in WhatsApp & it is same like that.
Not too much useful features but yes if you want to Hide your story from some specific person then you can use it.

Celebrating the developers behind the best apps and games of 2018


Posted by Purnima Kochikar, Director, Business Development, Games & Applications


Today, we announced our annual Best of 2018 list, highlighting the best content on Google Play. But ever wonder about the makers behind your favorite apps and games like PUBG MOBILE or Tasty? Well, we wanted to take a moment to celebrate the developers that brought to life the best U.S. apps and games of 2018. And this year was jam packed with entertainment — all thanks to the developers who pushed the envelope and sparked our imaginations.


Check out the full rundown of the developers behind the best apps and games of 2018 on Google Play:


Best App of 2018


Most Entertaining Apps


Best Self Improvement Apps


Best Daily Helper Apps


Best Hidden Gem Apps


Best Game of 2018


Most Competitive Games


Most Innovative Games


Best Indie Games


Most Casual Games


Sunday, 2 December 2018

How To Flash Any Mediatek Smartphone Using Sp Flash Tool

Hello friends, How are you?

Are you a smartphone user? Are you a fan of custom roms? Have you tried to install a custom rom on your device? Are your device is bricked?
Then this article is just for you because in this article i will show you how to fix soft bricked phone and how to flash your phone.


Whenever you tried to install a custom rom which is not meant to be for your device or although it is made for your device, due to some bugs your phone may gets bricked and causes a bootloop problem and your device won't start. So in order to fix this problem, you have to flash your device.


Follow below steps to flash your mediatek device using Sp Flash tool

Step 1 - First of all you need to download stock rom for your device. For that go to this website androidmtk.com and search for your device model and download official firmware from there. 

Step 2 - Now extract this downloaded file on your pc. You can see many folder inside your extracted file. Like driver, firmware, Sp Flash tool,etc...


Step 3 - Third step is to install drivers on your pc. For that go to driver folder in your extracted file and right click on driver file and then click on install. You have to install all the driver one by one. 

Note - sometimes you may get error like 'driver signature not verified' while installing the driver. To solve this read below article. 

Read - Disable Driver Signature Verification On Your Windows PC

Step 4 - After successfully installing driver, open Sp Flash tool folder and click on 'Flash tool.exe'.

Step 5 - After opening Sp Flash tool you have to load scatter file. For that click on choose. 


Step 6 - Now select scatter file which is located in 'Your-extracted-folder/firmware/MTxxxx_android_scatter'.


Step 7 - Now you can see screen like below image. Now most imaport thing is to make sure you select 'download only'. Don't select other option. (see below image for more understanding). 


Step 8 - Now click on 'download

Step 9 - After doing above steps, now connect your Android device to your pc via USB cable. (make sure you switched off your phone).

Step 10 - Now randomly press any buttons(volume-up, volume-down, power button) so that sp Flash tool can detect your device. 


Step 11 - Once Sp Flash Tool detects your device you can see flashing progress at bottom in sp Flash tool. Wait until the process completes. 

Step 12 - After process completes, disconnect your device with pc and turn on your device. Remember first boot will take time upto 5-10 mins, so wait until your device properly boots.

Now, you have successfully flashed your device and you can enjoy original stock android experience on your device.

If you guys have any query then please do comments and let me know. 

Read - How To Add Twitter Card Meta-Tags To Blogger/WordPress


THANK YOU. 
I HOPE THIS INFORMATION WILL HELP YOU. 
ENJOY... ENJOY... ENJOY... 


Saturday, 1 December 2018

Ping Pong game AIA file for Appybuilder | Blaster AIA files

Ping Pong game AIA file :


APP SCREENSHOTS :


DESCRIPTION :

                                   
                             This aia file work in appybuilder and we can create an ping pong game with this aia file. This game has a simple splash screen  and nine levels and  daily bonus system.This is best game ever in thunkable, kodular, app inventor and appybuilder. The game has setting option in which we can control music and sound in the app.We can add the video ads in this game and gain more revenue from this.The app shows the score in the coin format and shows the number of star how the level is complete. The ball speed is increase with each levels.Each levels has the target coin to complete the levels.The app has simple exit button similar in appearance of app.By study this game blocks we can made this game in thunkable, app inventor and kodular.

FEATURES :

1) Splash screen
2) Best UI [ USER INTERFACE ]
3] Better speed.

CLICK TO DOWNLOAD AIA FILE :


                                     DOWNLOAD AIA