Wednesday, 14 November 2018

An Update on Project Treble


Posted by Iliyan Malchev, Project Treble Architect


Last week at the 2018 Android Dev Summit, we demonstrated the benefits of Project Treble by showing the same Generic System Image (GSI) running on devices from different OEMs. We highlighted the availability of GSI for Android 9 Pie that app developers can use to develop and test their apps with Android 9 on any Treble-compliant device.


Launched with Android Oreo in 2017, Project Treble has enabled OEMs and silicon vendors to develop and deploy Android updates faster than what was previously possible. Since then, we've been working with device manufacturers to define Vendor Interfaces (VINTF) and draw a clear separation between vendor and framework code on Android devices.


Going forward, all devices launching with Android 9 Pie or later will be Treble-compliant and take full advantage of the Treble architecture to deliver faster upgrades. Thanks to Treble, we expect to see more devices from OEMs running Android 9 Pie at the end of 2018 as compared to the number of devices that were running Android Oreo at the end of 2017.


The GSI is built from the latest available AOSP source code, including the latest bug fixes contributed by OEMs. Device manufacturers already use GSI to validate the implementation of the vendor interface on their devices, and Android app developers can now harness the power of the GSI to test their apps across different devices. With GSI, you can test your apps on a pure AOSP version of the latest Android dessert, including the latest features and behavior changes, on any Treble-compliant device that's unlocked for flashing.


We're continuing to work on making GSI even more accessible and useful for app developers. For example, the GSI could enable early access to future Android platform builds that you can run on a Treble-compliant Android 9 device, so you could start app development and validation before the AOSP release.


If you are interested in trying GSI today, check out the documentation for full instructions on how to build GSI yourself and flash it to your Treble-compliant device.

Tuesday, 13 November 2018

Add Twitter Card Meta-Tags To Blogger/Wordpress

We all know that twitter is the best social media platform to get connected with your followers and to drive huge traffic towards your post, not only twitter but facebook, google+ etc... are also important.


For example,
As a blogger, you have made a website and wrote an amazing post or article. Now you heard somewhere that social media platform will help you to get more traffic to your site. so you made twitter account for your site and now you wanted to share your article, so you copied link of that article and just tweeted it, and thinking that your tweet will show image,title,description from your article, but what you see is just a link which you have pasted, nothing more nothing less. Now you wondering that why this happed? why image,title won't showed up? and then you acted like smart, you deleted your tweet and again pasted your link and tweeted it thinking that this time it will show everything, but this time also you see that god damn link.

After trying your best, finally you came to google and searching like why my twitter post doesn't show image/title? how to show image/article title on twitter post? etc... So, if you are here then you are at the right place because you will get solution of your problem in this article.


READ  -  🔗 Add Facebook Open Graph Meta-Tags To Blogger/Wordpress
 

What is Twitter Card Meta-Tags?

Twitter card meta-tags are just simple HTML code which we have to add in our website to take control over how our post will going to be look like when we share any url from our site on twitter.

If your website have twitter Meta-Tags then whenever you share any url from your site, twitter will try to fetch information from that url and it will show images,title,description etc... according to that url.


Types of Twitter Cards

  • Summary card  -  Default card, including a title, description, thumbnail, and Twitter account attribution.
  • Summary with large image  -  The Summary Card with Large Image features a large, full-width prominent image alongside a tweet. It is designed to give the reader a rich photo experience, and clicking on the image brings the user to your website.
  • Gallery card  -  A Tweet card geared toward highlighting a collection of photos.
  • Player card  -  A Tweet sized video/audio/media player card.
  • App card  -  A Tweet card for providing a profile of an application.
  • Product card  -  A Tweet card to better represent product content. 


Adding Twitter Card Meta-Tags To Blogger

To add twitter cards to your site you just have to add below code in your site's HTML.

You have to add code between,

<head>
add here
</head>

I recommend you to add just above </head> so that things don't get messed up.

-------------------------------------

<!-- Twitter Card Tags Start-->
<meta content='summary_large_image' name='twitter:card'/>
<!-- Title, URL & Description -->
<b:if cond='data:blog.pageName'>
<meta expr:content='data:blog.pageName' name='twitter:title'/>
<b:else/>
<meta content='YOUR-SITE-NAME' name='twitter:title'/>
</b:if>
<meta expr:content='data:blog.url' name='twitter:url'/>
<b:if cond='data:blog.metaDescription'>
<meta expr:content='data:blog.metaDescription' name='twitter:description'/>
<b:else/>
<meta expr:content='data:post.snippet' name='twitter:description'/>
</b:if>
<!-- Image -->
<b:if cond=' data:blog.postImageUrl'>
<meta expr:content=' data:blog.postImageUrl' name='twitter:image'/>
<meta content='800' property='twitter:image:width'/>
<meta content='418' property='twitter:image:height'/>
</b:if>
<!-- Twitter specific -->
<meta content='@YOUR-SITE-NAME' name='twitter:site'/>
<meta content='@TWITTER-ACCOUNT-NAME' name='twitter:creator'/>
<!-- Twitter Card Tags Ends-->


--------------------------------------

Things To Be Replaced 
1. YOUR-SITE-NAME  -  Here enter your site name or blog name.(for example 🔗 TheStep4U)
2. TWITTER-ACCOUNT-NAME  -  Enter your twitter account name.(for example 🔗 TheStep4U)

Now save your HTML Theme and you are done.

If you want to see preview of your post then go to 🔗 Card Validator and enter any url for which you want to see preview and then click on preview card.

If you have any query, then please do comment and let me know.


I HOPE THIS INFORMATION WILL HELP YOU.
ENJOY...ENJOY...ENJOY... 


Saturday, 10 November 2018

Best Android PUBG Gaming Emulator For PC/windows/Mac | Android Emulator For Pc

Best Android PUBG Gaming Emulator For PC/windows/Mac | Android Emulator For Pc | Ko player.MeMu  play. Bluestacks. Andy,Nox player Emulator...Best Android Emulator For Pc.

Android Emulator is a great way to access Android apps on your computer many use an emulator for gaming to be able to use their keyboard,mouse or game controller.
you can also run other PUBG types of Android apps as well with so many emulators to choose.
Best Android Gaming Emulator For PC/windows/Mac

And Many Of you Definitely Want's to know About "Android Emulator Windows 10,Android Emulator Mac,Android Emulator nox,Andy Android Emulator,Android Emulator for pc Download,Bluestacks Android Emulator for pc,Pc Emulator for Android apk,Android Emulator for pc free Download To Play PUBG.
So Without Waiting more let's get started.....

Ko player Emulator

Number 5 is Ko player whose main focus is gaming it allows you to record your gameplay and upload it wherever you want it.


Best Android Gaming Emulator For PC/windows/Mac

It also allows for key mapping to emulate a controller with your keyboard.when you first launch Co player it will ask which mode that you want to maximize game performance select speed mode if you've run into any issues after starting Co player you can switch to compatible mode later on in settings along the Left you have several options here at the top selecting the keyboard icon will let you edit the keys for your keyboard if you're using a game controller you can activate it and map it to your preferred layout to switch from landscape to portrait mode select the rotate screen
icon you'll also find other options for taking screenshots recording and site loading apks like many of the Android emulators you have full access to the Google Play Store to install apps just use caution like you would on your phone or tablet when choosing which apps to install unfortunately on the home screen the app icons can't be moved co-player is completely free but like most emulators you'll have to deal with the occasional ads.

MeMu play Emulator

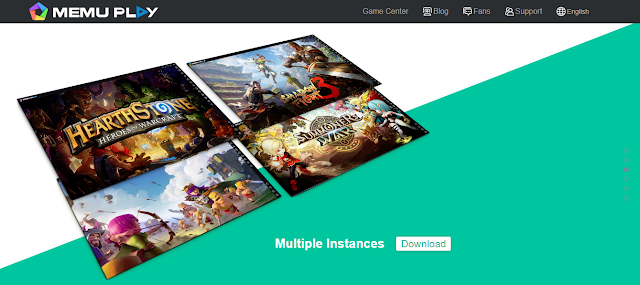
Number 4 is MeMu-play unlike Co Player which is based on Android KitKat.MeMu software supports apps up to Android lollipop 5.1.


Best Android Gaming Emulator For PC/windows/Mac

it supports multiple instances to run multiple apps simultaneously along with support for a mouse keyboard and gamepad in MeMu all the familiar options show up on the right side of the player to create multiple instances of the me mu player for multitasking purposes select the multi me move icon in the lower right click on create you can pick either android 5.1 or 4.4 5.1 is newer so most times you'll select that one then click on start and it will open a new window for me move so you can work on more than one task at a time me mu plays free to use and continues to improve with each new update annette.

Bluestacks Emulator

Number 3 is Bluestacks Emulator which is the best known android emulator and was recently updated to Android nougat.

Best Android Gaming Emulator For PC/windows/Mac

It has keyboard mouse and gamepad support along with the ability to run multiple apps side-by-side this emulator targets gamers a quick look at the user interface you'll see that we're in the App Center which lists recommended apps along with popular top grossing and trending in the right pane along the top you can access my apps which will show apps that you have installed if you need assistance you can go to the Help Center and to the right of the Help Center is Pico world which is there in platform reward currency system where you can redeem points for physical and digital goods in-app purchases and can be used to update skins I personally find Pico world to be more of a nuisance with its constant notifications let's go back to my apps the tabbed interface is a cool feature when opening an app it opens in a new tab this makes it easy to run multiple apps at the same time compare to most emulators BlueStacks is bloated so it may not run smoothly if you have a PC with lower system specs or an older computer anyone can use BlueStacks for free with no limits but they do charge a fee to remove the ads which varies depending on your region at last check here in the United States the fee was $2.00 per month.

Andy Emulator

Number 2 is Andy Emulator which is another popular Android emulator that's been around for many years and was also updated recently to Android nougat.


Best Android Gaming Emulator For PC/windows/Mac

It has a ton of features including being able to use your phone as a control I'll caution you right now when installing andy that has a history of setting off antivirus or malware security software at this time Andy and the others mentioned in this video are completely safe to use as usual just be careful when installing apps into the emulators that you only choose the apps that you trust as you can see Andy more closely resembles Android with a cleaner looking user interface then the others mentioned with less clutter holding down the left click here on your mouse while in the window will bring up the options to change your wallpaper add widgets and go into your settings going back to the home screen you had the familiar looking app drawer which shows you the apps that you have installed quite simply if you've ever used an Android device before this just may be the easiest Android emulator that you'll ever use Andy is completely free for personal use if you run a business they do have a pro version with plans starting at $12 per
month.

Nox player Emulator

Number one is Nox player but quite frankly.it was a toss-up between Andy and Knox for the number one spot even though nox only has compatibility up to lollipop 5.1.
I found it perform better than most of the other emulators for gaming.
Best Android Gaming Emulator For PC/windows/Mac

while including most of the same features Knox player has all the usual features that can be selected from the right side including shake keyboard control a multi instance manager a recorder screenshot tool and many others in addition you can change the theme by selecting the icon that looks like a t-shirt here at the top but the 5 to choose from there may be times when an app requires that your device be rooted in Knox player routing is easy select settings and check the box next to root and save your settings you'll need to restart Knox Player for the change to take effect that's all there is to it Knox player is completely free just like Andy and BlueStacks it's also available for Mac OS.
if you use another Android emulator not mentioned that you think others should try out let me know in the comments.

Friday, 9 November 2018

Get your app ready for foldable phones


Posted by Leo Sei, Product Manager on Android


As you may have heard from the Android Dev Summit, we announced that we're expanding support in Android to include Foldables, in preparation for upcoming devices from hardware partners like Samsung.


Here are a set of recommendations and information to make sure your application provides a great user experience on this new form factor (you can also check out the Android Dev Summit dedicated session here)


1. Screen continuity


On this new form factor, your application could be transitioned from one screen to another automatically (eg. when folding / unfolding a foldable phone).


During this transition, your app will receive a configuration change for the new layout (and possibly density in some cases).


To provide a great user experience when changing from one screen to the other, you want to make sure your app properly support runtime configuration change.


How to test: Emulators for various devices should become available soon (eg., Samsung will publish a folding / unfolding emulator apk later in Q4 which should work on Samsung Galaxy S4 tablets as well as the AOSP emulator in Android studio).


2. Multi-resume


Today, when an app is in multi-window but not focused, it is on the OnPause state.


While we provide recommendations on how to support multi-window, we noticed a significant number of apps are not handling the onPause state according to those recommendations (video paused or stopped, instant messages not displayed etc).


To help developers provide the best user experience on multi-window with minimal effort, we're allowing device manufacturers to keep all apps resumed when in multi-windows in P.


To opt-in to this behavior in Android P, add the following meta-data in your app manifest:


<meta-data android:name="android.allow_multiple_resumed_activities" android:value="true" />


Note: With the next Android version we're looking into how to optimize compatibility for this behavior.


How to test: There are no device at the moment with this behavior but device manufacturers are working to update existing devices to allow developers to test. Stay tuned for more details from device manufacturers.


3. Multi-display


Beginning with Android 8.0 (API level 26), the platform offers enhanced support for multiple displays. If an activity supports multi-window mode and is running on a device with multiple displays, users can move the activity from one display to another. When an app launches an activity, the app can specify which display the activity should run on. See here for the full documentation


How to test: You can try it out by using the "Developer options > Simulate secondary displays" option. Keep in mind that those simulated display do not process inputs.

Pocky bird game aia file for thunkable, appybuilder | Blaster AIA files

Pocky bird game aia file :


 App screenshots :


DESCRIPTION :


                              This aia file work in thunkable and app inventor and we can create a flappy bird game with this aia file.The game is very simple in design and have a simple splash screen. To play this game click on play button and pass the obstruct without touching them.The game shows the score and high score. The game also have the exit button. We can also make this game in appybuilder and kodular by examine the blocks.

Click here to Download :

                                       DOWNLOAD AIA

How To Download Paid Apps For Free Without Root.

Do You Want To Download Paid Apps For Free Without Root So Here it is....Download Paid Apps Free.

I already seen too many Apps On Playstore & They are not Free,It means to Download them you Have to Pay Money first with your Credit or Debit Card.When I was a child I was Unable to pay to Download my Favorite Games From Playstore but not Now.
So hay guys today I'm going to share with you "How to Download Paid Apps For Free In Android Without Root".
 Download Paid Apps For Free
Basically this is not going to be a Hack or nothing like that but it's a simple way or you can say a Simple Trick to Download any Paid Application for Free in your Device without paying money.
So let's start it,Firstly just go to Google in your any Browser & Findiut the Game link On Playstore.
Suppose want to download Accession Creed For my Android Device & I go to Playstore to Download as we know this is not a Free Game so how I'll get it for free. I'll go to Google & Search Accession Creed Game & on my browser I'll get the official Link of this game of Playstore,Now just copy that link.
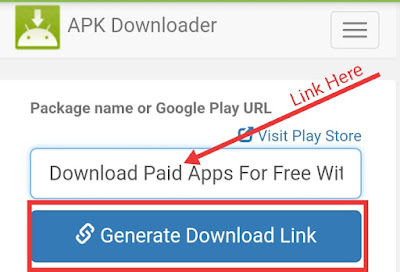
After that Just Go to APK Downloader Website. Basically this is Just a website but you can download Any Paid Application with it.
 Download Paid Apps For Free
Now just Copy & Paste App link in this Website as you can see in above Image & then Click Generate Download Link.
After that you'll able to see information about the app you want to download for Free Like- It's size,Publisher etc.
You'll also get another option to Download that Application.as you can see.
 Download Paid Apps For Free
Now Just click & Download this Application For Free without Paying Money.
One more important thing when you'll download this application it'll ask to To give Permission To Download From unknown Sources so just give that permission to Proceed.

Maybe this was helpful for you if you think i have forget anything or if you have any suggestions please know me in Comments.

Create/Get Facebook App ID For Your Blog Or Site

Hello friends,

This post will show you how to create or get facebook App_ID for your website or blog. Getting App_ID is not a big deal, you can get it within 5 minutes. So read the full post and see how it's done.


Facebook App_ID and Secret_key is a unique number given to every app created on facebook.

What's the use of FB App_ID?
You might wondering that what is the use of this App_ID and where to use it. But as a blogger we know that sometimes we need to add some plugins or meta-tag to our site. Some of these plugins required to enter this App_ID & Secret key. (for example. yesterday i was trying to add FB open graph meta-tags to my site which required this app_id. From there i got idea about this post).

Generally this is required when you are developing an app which have 'login with facbook' option. You can do lot more things with FB App ID. 


ALSO READ  -  How To Add Facebook Open Graph Meta-tags To Blogger/Wordpress

How To Create/Get FB App_ID & Secret_key

Step 1  -  Go to this page Facebook for developers 

Step 2  -  Click on '+ add a new app'


Step 3  -  Now enter 'Display name' & 'Contact email' and then click on create App ID.


Step 4  -   Now go to setting > basic and enter all the info. (you can leave namespace blank) (skip data protection officer contact info..).

Step 5  -  After adding above info, scroll down and click on 'add platfrom' and select 'website'.


Step 6  -  Now enter your website url and click on save changes.


step 7  -  Now you need to make your app live. For that go to app review and turn on switch to make your app live.


Now you have successfully created App_ID.
Note down your Id and use it wherever you required.


Read  -  How to Disable Driver Signature Enforcement In Windows

That's it for today. If you have any queries then please do comment and let me know.

THANK YOU
I HOPE THIS INFORMATION WILL HELP YOU.
ENJOY...ENJOY...ENJOY...