Friday, 22 February 2019
2019 Happy Holi script for all free to use [Happy Holi Blogger script]
Sunday, 27 January 2019
Android Pie P version 9.0
- WHAT IS ANDROID PIE ?
- FEATURES OF ANDROID PIE :
- Adaptive Battery.
- Adaptive Brightness.
- Slices.
- App Timer.
- Dashboard.
- New screenshot shortcut.
- New home button.
- Easy rotation feature.
- The Media Pannel.
- All Apps can use Https.
- Wifi Mac Randomization.
- Multiple camera support for access 2 cameras at a time.
- Accessibility feature.
- 157 new emojis.
- Improved message app.
- Lockdown mode.
- Dark mode.
- App actions.
- Improved DND service.
- Notification details.
- Easier text selection.
- Indoor Navigation with the help of wifi RTT.
- Art improvements.
- Wind down.
- New gestures.
Tuesday, 18 December 2018
Wrapping up for 2018 with Google Play and Android
Posted by Patricia Correa, Platforms & Ecosystems
Earlier this year we highlighted some of Google Play's milestones and commitments in supporting the 1M+ developers on the Play Store, as well as those of you working on Android apps and games and looking to launch and grow your business on our platforms. We have been inspired and humbled by the achievements of app and game developers, building experiences that delight and help people everywhere, as some stories highlighted in #IMakeApps.
We continue to focus on helping you grow thriving businesses and building tools and resources to help you reach and engage more users in more places, whilst ensuring a safe and secure ecosystem. Looking to 2019, we are excited about all the things to come and seeing more developers adopt new features and update to Android P.
In the meantime let's share some of the 2018 highlights on Google Play and Android:
Building for the future
Along with Android P we have continued to help the Android developer ecosystem, launching Android Jetpack, the latest Android Studio, and Kotlin support. Developers are also now able to add rich and dynamic UI templates with Slices in places such as Google Search and Assistant, APIs for new screens support, and much more. Discover the latest from Android 9, API Level 28.
Smaller apps have higher conversion rates and our research shows that a large app size is a key driver of uninstalls. At I/O we launched a new publishing format, the Android App Bundle, helping developers to deliver smaller and more efficient apps with a simplified release process, and with features on demand - saving on average 35% in download size! On devices using Android M and above, app bundles can reduce app size even further, by automatically supporting uncompressed native libraries, thereby eliminating duplication on devices.
You can build app bundles in the Android Studio 3.2 stable release and in Unity 2018.3 beta, and upload larger bundles with installed APK sizes of up to 500MB without using expansion files, through an early access feature soon to be available to all developers.
Richer experiences and discovery
Discovery of your apps and games is important, so we launched Google Play Instant and increased the size limit to 10MB to enable TRY NOW on the Play Store, and removed the URL requirement for Instant apps. Android Studio 3.3 beta release, lets you publish a single app bundle and classify it or a particular module to be instant enabled (without maintaining separate code).
For game developers, Unity introduced the Google Play Instant plug-in and instant app support is built into the new Cocos Creator. Our app pre-registration program, has seen nearly 250 million app pre-registrations, helping drive app downloads through richer discovery.
Optimizing for quality and performance
Android vitals are now more actionable, with a dashboard highlighting core vitals, peer benchmarks, start-up time and permission denials vitals, anomaly detection and alerts, and linking pre-launch reports - all so that you can better optimize and prioritize issues for improved quality and performance.
There are more opportunities to get feedback and fix issues before launch. The Google Play Console expanded the functionality of automated device testing with a pre-launch report for games, and the launch of the internal and closed test tracks lets you push your app to up to 100 internal testers, before releasing them to production.
Insights for your business, now and in the long term
Metrics are critical to optimize your business and we've added new customizable tools in the Play Console, with downloadable reports to help you evaluate core metrics. Including cumulative data, 30-day rolling averages, and roll-ups for different time periods to better match the cadence of your business.
You can now configure the statistics report to show how your instant apps are performing, analyze different dimensions and identify how many install the final app on their device. The acquisition report shows users discovery journey through to conversion - with average revenue per user and retention benchmarks against similar apps. You can also find the best performing search terms for your store listing with organic breakdown - helping to optimize efforts to grow and retain a valuable audience.
Increasingly developers are adopting subscriptions as their core monetization model. The dedicated new subscriptions center means you can easily change subscription prices, offer partial refunds for in-app products and subscriptions, and also make plan changes in Play Billing Library version 1.2. Learn how to keep subscribers engaged; users can pause plans, giving you more control with order management and the cancellation survey.
Discover how to use all the new features and best practices on the Academy for App Success, our interactive free e-learning platform, offering bite-sized courses that help you make the most of Play Console and improve your app quality.
Make sure you follow @googleplaydev and sign up to our newsletter to stay ahead of all our updates in 2019! We hope these features and tools will enable us to continue a successful partnership with you in the New Year - follow our countdown for a daily highlight. From all of us at Google Play - happy holidays.
How useful did you find this blog post?
★ ★ ★ ★ ★Friday, 19 October 2018
Android Protected Confirmation: Taking transaction security to the next level

Posted by Janis Danisevskis, Information Security Engineer, Android Security
In Android Pie, we introduced Android Protected Confirmation, the first major mobile OS API that leverages a hardware protected user interface (Trusted UI) to perform critical transactions completely outside the main mobile operating system. This Trusted UI protects the choices you make from fraudulent apps or a compromised operating system. When an app invokes Protected Confirmation, control is passed to the Trusted UI, where transaction data is displayed and user confirmation of that data's correctness is obtained.
Once confirmed, your intention is cryptographically authenticated and unforgeable when conveyed to the relying party, for example, your bank. Protected Confirmation increases the bank's confidence that it acts on your behalf, providing a higher level of protection for the transaction.
Protected Confirmation also adds additional security relative to other forms of secondary authentication, such as a One Time Password or Transaction Authentication Number. These mechanisms can be frustrating for mobile users and also fail to protect against a compromised device that can corrupt transaction data or intercept one-time confirmation text messages.
Once the user approves a transaction, Protected Confirmation digitally signs the confirmation message. Because the signing key never leaves the Trusted UI's hardware sandbox, neither app malware nor a compromised operating system can fool the user into authorizing anything. Protected Confirmation signing keys are created using Android's standard AndroidKeyStore API. Before it can start using Android Protected Confirmation for end-to-end secure transactions, the app must enroll the public KeyStore key and its Keystore Attestation certificate with the remote relying party. The attestation certificate certifies that the key can only be used to sign Protected Confirmations.
There are many possible use cases for Android Protected Confirmation. At Google I/O 2018, the What's new in Android security session showcased partners planning to leverage Android Protected Confirmation in a variety of ways, including Royal Bank of Canada person to person money transfers; Duo Security, Nok Nok Labs, and ProxToMe for user authentication; and Insulet Corporation and Bigfoot Biomedical, for medical device control.
Insulet, a global leading manufacturer of tubeless patch insulin pumps, has demonstrated how they can modify their FDA cleared Omnipod DASH TM Insulin management system in a test environment to leverage Protected Confirmation to confirm the amount of insulin to be injected. This technology holds the promise for improved quality of life and reduced cost by enabling a person with diabetes to leverage their convenient, familiar, and secure smartphone for control rather than having to rely on a secondary, obtrusive, and expensive remote control device. (Note: The Omnipod DASH™ System is not cleared for use with Pixel 3 mobile device or Protected Confirmation).
This work is fulfilling an important need in the industry. Since smartphones do not fit the mold of an FDA approved medical device, we've been working with FDA as part of DTMoSt, an industry-wide consortium, to define a standard for phones to safely control medical devices, such as insulin pumps. A technology like Protected Confirmation plays an important role in gaining higher assurance of user intent and medical safety.
To integrate Protected Confirmation into your app, check out the Android Protected Confirmation training article. Android Protected Confirmation is an optional feature in Android Pie. Because it has low-level hardware dependencies, Protected Confirmation may not be supported by all devices running Android Pie. Google Pixel 3 and 3XL devices are the first to support Protected Confirmation, and we are working closely with other manufacturers to adopt this market-leading security innovation on more devices.
Wednesday, 10 October 2018
Control Flow Integrity in the Android kernel

Posted by Sami Tolvanen, Staff Software Engineer, Android Security
Android's security model is enforced by the Linux kernel, which makes it a tempting target for attackers. We have put a lot of effort into hardening the kernel in previous Android releases and in Android 9, we continued this work by focusing on compiler-based security mitigations against code reuse attacks.
Google's Pixel 3 will be the first Android device to ship with LLVM's forward-edge Control Flow Integrity (CFI) enforcement in the kernel, and we have made CFI support available in Android kernel versions 4.9 and 4.14. This post describes how kernel CFI works and provides solutions to the most common issues developers might run into when enabling the feature.
Protecting against code reuse attacks
A common method of exploiting the kernel is using a bug to overwrite a function pointer stored in memory, such as a stored callback pointer or a return address that had been pushed to the stack. This allows an attacker to execute arbitrary parts of the kernel code to complete their exploit, even if they cannot inject executable code of their own. This method of gaining code execution is particularly popular with the kernel because of the huge number of function pointers it uses, and the existing memory protections that make code injection more challenging.
CFI attempts to mitigate these attacks by adding additional checks to confirm that the kernel's control flow stays within a precomputed graph. This doesn't prevent an attacker from changing a function pointer if a bug provides write access to one, but it significantly restricts the valid call targets, which makes exploiting such a bug more difficult in practice.
Figure 1. In an Android device kernel, LLVM's CFI limits 55% of indirect calls to at most 5 possible targets and 80% to at most 20 targets.
Gaining full program visibility with Link Time Optimization (LTO)
In order to determine all valid call targets for each indirect branch, the compiler needs to see all of the kernel code at once. Traditionally, compilers work on a single compilation unit (source file) at a time and leave merging the object files to the linker. LLVM's solution to CFI is to require the use of LTO, where the compiler produces LLVM-specific bitcode for all C compilation units, and an LTO-aware linker uses the LLVM back-end to combine the bitcode and compile it into native code.
Figure 2. A simplified overview of how LTO works in the kernel. All LLVM bitcode is combined, optimized, and generated into native code at link time.
Linux has used the GNU toolchain for assembling, compiling, and linking the kernel for decades. While we continue to use the GNU assembler for stand-alone assembly code, LTO requires us to switch to LLVM's integrated assembler for inline assembly, and either GNU gold or LLVM's own lld as the linker. Switching to a relatively untested toolchain on a huge software project will lead to compatibility issues, which we have addressed in our arm64 LTO patch sets for kernel versions 4.9 and 4.14.
In addition to making CFI possible, LTO also produces faster code due to global optimizations. However, additional optimizations often result in a larger binary size, which may be undesirable on devices with very limited resources. Disabling LTO-specific optimizations, such as global inlining and loop unrolling, can reduce binary size by sacrificing some of the performance gains. When using GNU gold, the aforementioned optimizations can be disabled with the following additions to LDFLAGS:
LDFLAGS += -plugin-opt=-inline-threshold=0 \
-plugin-opt=-unroll-threshold=0
Note that flags to disable individual optimizations are not part of the stable LLVM interface and may change in future compiler versions.
Implementing CFI in the Linux kernel
LLVM's CFI implementation adds a check before each indirect branch to confirm that the target address points to a valid function with a correct signature. This prevents an indirect branch from jumping to an arbitrary code location and even limits the functions that can be called. As C compilers do not enforce similar restrictions on indirect branches, there were several CFI violations due to function type declaration mismatches even in the core kernel that we have addressed in our CFI patch sets for kernels 4.9 and 4.14.
Kernel modules add another complication to CFI, as they are loaded at runtime and can be compiled independently from the rest of the kernel. In order to support loadable modules, we have implemented LLVM's cross-DSO CFI support in the kernel, including a CFI shadow that speeds up cross-module look-ups. When compiled with cross-DSO support, each kernel module contains information about valid local branch targets, and the kernel looks up information from the correct module based on the target address and the modules' memory layout.
Figure 3. An example of a cross-DSO CFI check injected into an arm64 kernel. Type information is passed in X0 and the target address to validate in X1.
CFI checks naturally add some overhead to indirect branches, but due to more aggressive optimizations, our tests show that the impact is minimal, and overall system performance even improved 1-2% in many cases.
Enabling kernel CFI for an Android device
CFI for arm64 requires clang version >= 5.0 and binutils >= 2.27. The kernel build system also assumes that the LLVMgold.so plug-in is available in LD_LIBRARY_PATH. Pre-built toolchain binaries for clang and binutils are available in AOSP, but upstream binaries can also be used.
The following kernel configuration options are needed to enable kernel CFI:
CONFIG_LTO_CLANG=y
CONFIG_CFI_CLANG=y
Using CONFIG_CFI_PERMISSIVE=y may also prove helpful when debugging a CFI violation or during device bring-up. This option turns a violation into a warning instead of a kernel panic.
As mentioned in the previous section, the most common issue we ran into when enabling CFI on Pixel 3 were benign violations caused by function pointer type mismatches. When the kernel runs into such a violation, it prints out a runtime warning that contains the call stack at the time of the failure, and the call target that failed the CFI check. Changing the code to use a correct function pointer type fixes the issue. While we have fixed all known indirect branch type mismatches in the Android kernel, similar problems may be still found in device specific drivers, for example.
CFI failure (target: [<fffffff3e83d4d80>] my_target_function+0x0/0xd80):
------------[ cut here ]------------
kernel BUG at kernel/cfi.c:32!
Internal error: Oops - BUG: 0 [#1] PREEMPT SMP
…
Call trace:
…
[<ffffff8752d00084>] handle_cfi_failure+0x20/0x28
[<ffffff8752d00268>] my_buggy_function+0x0/0x10
…
Figure 4. An example of a kernel panic caused by a CFI failure.
Another potential pitfall are address space conflicts, but this should be less common in driver code. LLVM's CFI checks only understand kernel virtual addresses and any code that runs at another exception level or makes an indirect call to a physical address will result in a CFI violation. These types of failures can be addressed by disabling CFI for a single function using the __nocfi attribute, or even disabling CFI for entire code files using the $(DISABLE_CFI) compiler flag in the Makefile.
static int __nocfi address_space_conflict()
{
void (*fn)(void);
…
/* branching to a physical address trips CFI w/o __nocfi */
fn = (void *)__pa_symbol(function_name);
cpu_install_idmap();
fn();
cpu_uninstall_idmap();
…
}
Figure 5. An example of fixing a CFI failure caused by an address space conflict.
Finally, like many hardening features, CFI can also be tripped by memory corruption errors that might otherwise result in random kernel crashes at a later time. These may be more difficult to debug, but memory debugging tools such as KASAN can help here.
Conclusion
We have implemented support for LLVM's CFI in Android kernels 4.9 and 4.14. Google's Pixel 3 will be the first Android device to ship with these protections, and we have made the feature available to all device vendors through the Android common kernel. If you are shipping a new arm64 device running Android 9, we strongly recommend enabling kernel CFI to help protect against kernel vulnerabilities.
LLVM's CFI protects indirect branches against attackers who manage to gain access to a function pointer stored in kernel memory. This makes a common method of exploiting the kernel more difficult. Our future work involves also protecting function return addresses from similar attacks using LLVM's Shadow Call Stack, which will be available in an upcoming compiler release.
Tuesday, 7 August 2018
Android Pie SDK is now more Kotlin-friendly

Posted by James Lau, Product Manager (@jmslau)
When using the Java programming language, one of the most common pitfalls is trying to access a member of a null reference, causing a NullPointerException to be thrown. Kotlin offers protection against this by baking nullable and non-nullable types into the type system. This helps eliminate NullPointerExceptions from your code and improve your app's overall quality. When Kotlin code is calling into APIs written in the Java programming language, it relies on nullability annotations in those APIs to determine the nullability of each parameter and the return type. Unannotated parameters and return types are treated as platform types, which weakens the null-safety guarantee of Kotlin.
As part of yesterday's Android 9 announcement, we have also released a new Android SDK that contains nullability annotations for some of the most frequently used APIs. This will preserve the null-safety guarantee when your Kotlin code is calling into any annotated APIs in the SDK. Even if you are using the Java programming language, you can still benefit from these annotations by using Android Studio to catch nullability contract violations.
Not a breaking change
Normally, nullability contract violations in Kotlin result in compilation errors. But to ensure the newly annotated APIs are compatible with your existing code, we are using an internal mechanism provided by the Kotlin compiler team to mark the APIs as recently annotated. Recently annotated APIs will result only in warnings instead of errors from the Kotlin compiler. You will need to use Kotlin 1.2.60 or later.
Our plan is to have newly added nullability annotations produce warnings only, and increase the severity level to errors starting in the following year's Android SDK. The goal is to provide you with sufficient time to update your code.
How to use the "Kotlin-friendly" SDK
To get started, go to Tools > SDK Manager in Android Studio. Select Android SDK on the left menu, and make sure the SDK Platforms tab is open.
Use SDK Manager in Android Studio to install SDK for API Level 28 Revision 6
Check Android 8.+ (P) and click OK. This will install the Android SDK Platform 28 revision 6 if it is not already installed. After that, set your project's compile SDK version to API 28 to start using the new Android Pie SDK with nullability annotations.
Use the Project Structure Dialog to change your project's Compile Sdk Version to API 28
You may also need to update your Kotlin plugin in Android Studio if it's not already up-to-date. Make sure your Kotlin plugin version is 1.2.60 or later by going to Tools > Kotlin > Configure Kotlin Plugin Updates.
Once it's set up, your builds will start showing warnings if you have any code that violates nullability contracts in the Android SDK. An example of such a warning is shown below.
Sample warning from the Kotlin compiler when code violates a
recently added nullability contract in the Android SDK.
You will also start seeing warnings in Android Studio's code editor if you call an Android API with the incorrect nullability. An example is shown below.
Android Studio warning about passing a null reference to a parameter
annotated as a recently non-null type in the android.graphics.Path API.
Leveraging nullability annotations from the Java programming language
You can benefit from the new nullability annotations even if your code is in the Java programming language. By default, Android Studio will highlight any nullability contract violations with a warning, like the one below:
Android Studio showing a warning about nullability contract violation
in code written in the Java programming language
To ensure that you have this inspection enabled, you can go to the IDE's settings page and search for "Constant conditions & exceptions" inspection and make sure that item is checked.
Use the Inspections page under Settings to ensure the Constant conditions & exceptions code inspection is enabled.
If you are using the Java programming language, nullability contract violations will not produce any compiler warning or error. Only the in-IDE code inspections are available to flag these issues.
You can also run code inspections across your entire project and see the aggregated results. Click on Analyze > Inspect Code… to start.
What's Next
The Android SDK API surface is very large, and we have only annotated a small percentage of the APIs so far - there is still lots of work remaining. Over the next several Android SDK releases, we will continue to add nullability annotations to the existing Android APIs, as well as making sure new APIs are annotated.
With the "Kotlin-friendly" Android SDK, the nullability annotations in AndroidX (part of the Jetpack family), and Android KTX, we are continuing to improve the Android APIs for developers using Kotlin. If you have not yet tried Kotlin, we encourage you to try it. Not only can Kotlin make your code more concise, it can also improve the stability of your apps.
Happy Kotlin-ing!
Monday, 30 July 2018
Supporting display cutouts on edge-to-edge screens

Posted By Megan Potoski, Product Manager, Android System UI
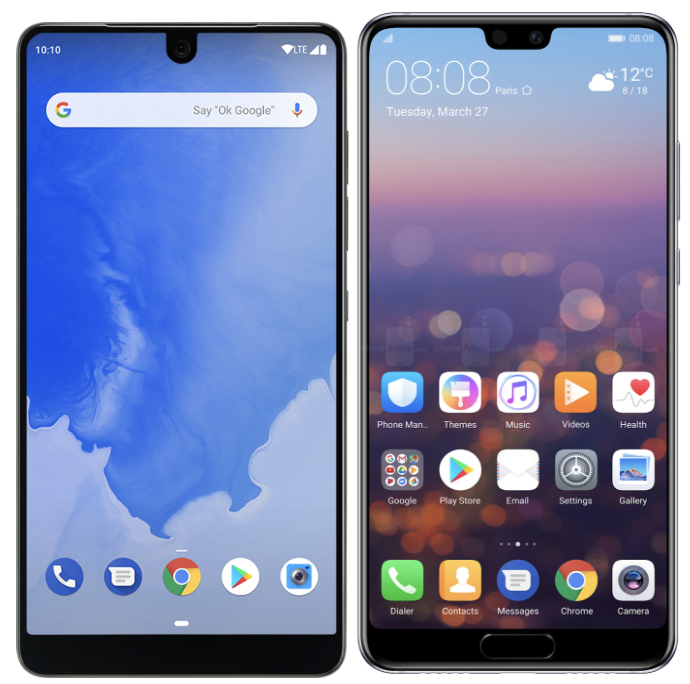
Smartphones are quickly moving towards smaller bezels and larger aspect ratios. On these devices, display cutouts are a popular way to achieve an edge-to-edge experience while providing space for important sensors on the front of the device. There are currently 16 cutout devices from 11 OEMs already released, including several Android P beta devices, with more on the way.
These striking displays present a great opportunity for you to showcase your app. They also mean it's more important than ever to make sure your app provides a consistently great experience across devices with one or two display cutouts, as well as devices with 18:9 and larger aspect ratios.
Examples of cutout devices: Essential PH-1 (left) and Huawei P20 (right).
Make your app compatible with display cutouts
With many popular and upcoming devices featuring display cutouts, what can you do to make sure your app is cutout-ready?
The good news is, for the most part your app should work as intended even on a cutout device. By default, in portrait mode with no special flags set, the status bar will be resized to be at least as tall as the cutout and your content will display in the window below. In landscape or fullscreen mode, your app window will be letterboxed so that none of your content is displayed in the cutout area.
However, there are a few areas where your app could have issues on cutout devices.
- Watch out for any sort of hard-coding of status bar height -- this will likely cause problems. If possible, use WindowInsetsCompat to get status bar height.
- In fullscreen, be careful to consider when to use window vs. screen coordinates, as your app will not take up the whole screen when letterboxed. For example, if you use MotionEvent.getRawX/Y() to get screen coordinates for touch events, make sure to transform them to the view's coordinates using getLocationOnScreen().
- Pay special attention to transitions in and out of fullscreen mode.
Here are a few guidelines describing what issues to look out for and how to fix them.
Take advantage of the cutout area
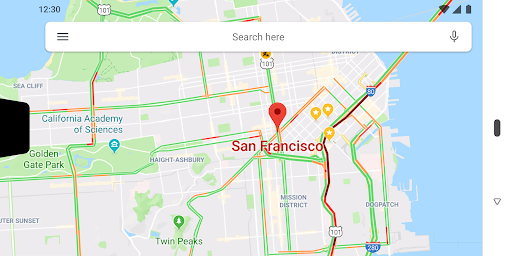
Rendering your app content in the cutout area can be a great way to provide a more immersive, edge-to-edge experience for users, especially for content like videos, photos, maps, and games.
An example of an app that has requested layout in the display cutout.
In Android P we added APIs to let you manage how your app uses the display cutout area, as well as to check for the presence of cutouts and get their positions.
You can use layoutInDisplayCutoutMode, a new window layout mode, to control how your content is displayed relative to the cutout. By default, the app's window is allowed to extend into the cutout area if the cutout is fully contained within a system bar. Otherwise, the window is laid out such that it does not overlap with the cutout. You can also set layoutInDisplayCutoutMode to always or never render into the cutout. Using SHORT_EDGES mode to always render into the cutout is a great option if you want to take advantage of the full display and don't mind if a bit of content gets obscured by the cutout.
If you are rendering into the cutout, you can use getDisplayCutout() to retrieve a DisplayCutout that has the cutout's safe insets and bounding box(es). These let you check whether your content overlaps the cutout and reposition things if needed.
<style name="ActivityTheme">
<item name="android:windowLayoutInDisplayCutoutMode">
default/shortEdges/never
</item>
</style>
Attribute for setting layoutInDisplayCutoutMode from the Activity's theme.
For devices running Android 8.1 (API 27), we've also back-ported the layoutInDisplayCutoutMode activity theme attribute so you can control the display of your content in the cutout area. Note that support on devices running Android 8.1 or lower is up to the device manufacturer, however.
To make it easier to manage your cutout implementation across API levels, we've also added DisplayCutoutCompat in the AndroidX library, which is now available through the SDK manager.
For more about the display cutout APIs, take a look at the documentation.
Test your app with cutout
We strongly recommend testing all screens and experiences of your app to make sure that they work well on cutout devices. We recommend using one of the Android P Beta Devices that features a cutout, such as the Essential PH-1.
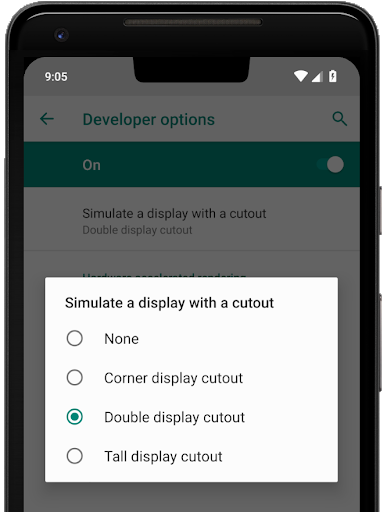
If you don't have a device, you can also test using a simulated cutout on any device running Android P or in the Android Emulator. This should help you uncover any issues that your app may run into on devices with cutouts, whether they are running Android 8.1 or Android P.
What to expect on devices with display cutouts
Android P introduces official platform support for display cutouts, with APIs that you can use to show your content inside or outside of the cutout. To ensure consistency and app compatibility, we're working with our device manufacturer partners to mandate a few requirements.
First, devices must ensure that their cutouts do not negatively affect apps. There are two key requirements:
- In portrait orientation, with no special flags set, the status bar must extend to at least the height of the cutout.
- In fullscreen or landscape orientation, the entire cutout area must be letterboxed.
Second, devices may only have up to one cutout on each short edge of the device. This means that:
- You won't see multiple cutouts on a single edge, or more than two cutouts on a device.
- You won't see a cutout on the left or right long edge of the device.
Within these constraints, devices can place cutouts wherever they want.
Special mode
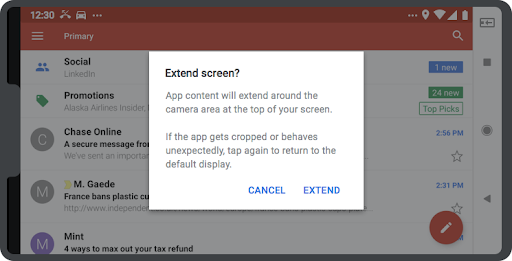
Some devices running Android 8.1 (API level 27) or earlier may optionally support a "special mode" that lets users extend a letterboxed fullscreen or landscape app into the cutout area. Devices would typically offer this mode through a toggle in the navigation bar, which would then bring up a confirmation dialog before extending the screen.
Devices that offer "special mode" allow users to optionally extend apps into the cutout area if supported by the app.
If your app's targetSdkVersion is 27 or higher, you can set the layoutInDisplayCutoutMode activity theme attribute to opt-out of special mode if needed.
Don't forget: larger aspect ratios too!
While you are working on cutout support, it's also a great time to make sure your app works well on devices with 18:9 or larger aspect ratios, especially since these devices are becoming increasingly common and can feature display cutouts.
We highly encourage you to support flexible aspect ratios so that your app can leverage the full display area, no matter what device it's on. You should test your app on different display ratios to make sure it functions properly and looks good.
Here are some guidelines on screens support to keep in mind as you are developing, also refer to our earlier post on larger aspect ratios for tips on optimizing. If your app can't adapt to the aspect ratios on long screens, you can choose to declare a max aspect ratio to request letterboxing on those screens.
Thanks for reading, and we hope this helps you deliver a delightful experience to all your users, whatever display they may have!