Tuesday, 15 November 2016

How to Get More Followers on Twitter


Hello Everyone, I meet many followers who ever asked me how to get more followers on twitter. And I always said that the number of follower are not important for your twitter business page, important is how you have a unique followers who think about your tweet and what you explain on your tweet or pictures.  But if you want to get more followers on twitter, I will Tell You to increase your twitter followers.

In this tutorial I will guide you, how to get more followers on twitter. 

So let's Get Start.

First of all guys we must have the knowledge of twitter. Twitter is a big social network service where you share your pictures and write your limit short post. Twitter is one of the most developing or engaging social website at this time. Here you share your tweet as short message type. Here you send or read short tweet 140 character.  310 million active users use twitter account. One billion monthly unique visitors use twitter website in one month.  

Why We Want More Followers on Twitter

Many reason to want more followers on twitter, but today I will tell you three main reasons to want more followers.

Improve Your website Traffic:-  If you have more followers , you can attract on your website or improve you website Traffic and also improve your Business. If your tweet is unique or your post is good content always visit on your website and when users visit your website, then automatically increase your website traffic.

More Followers Make Good Impression:- 
Any visitor visit on your profile and he saw your number of followers it make a good impression on your business. People think you are expert on your business and he will take interest on your tweets. And 80% percent visitors follow you on twitter.

More Followers More People Trust :- 
when users visit our account and see your followers or number of tweets then user think he is perfect on his topic and he know  well about his topic. It makes a trust on your business page.

Here Some Tips for Twitter Users.


1- Attractive Profile Picture or Background:-  
As my experience,  you have to add attractive profile pictures or background related to your business page. Because when user visit your account and your profile or background are not attractive, then it make a negativity on user mind.

2- Follow more people:- 
Follow more people who interested in your business page. For example, suppose your twitter account related to marketing, and then follow whose people who interested in marketing.


3- Scheduled your tweet:- 
you have to choose one time, when you do tweet. If you not available to do tweets, then use tools who do post on your scheduled time.


4- Using Hashtag:- 
when you do tweet, please always keep in mind. Always use hashtag , it is improve your tweet. And increase your engagement of your tweets.

5- Give link on your tweet:- 
As we know that, twitter give us limited words, and we didn’t elaborate what I say in our tweet so it important to give a link on your tweet.

6- Always Retweet:-  
when you do tweet, and any user retweet on your tweets please must reply on his retweet. it increase 2 time more engagement on your twitter account.

7- Promote your twitter:-  
Promote your twitter account who interested  on your business  topics.


8- Always use your face:- 
Please use your real photo, no one see your brands logo anyone want a real person behind our brand.

These 8 method use in your twitter account and it help to increase the number of followers. And if you have any doubt please let me know through your comment. If you like this tutorial don’t forget to share on social.


How to delete Facebook Page or Facebook Account


Hello everyone, I receive many messages or tweets, how to delete Facebook page or Facebook account? Today I will teach you how to delete Facebook fan page or account. It is very simple method to delete Facebook account or page. I hope that will you really enjoy this.
So , lets get start.

How to delete (not deactivate) Facebook Account permanently

First you must have a Facebook account which you have to delete permanently. Then login your Facebook Account. Then go to setting, and click on Security option. As you can see on the picture.


When you enter on security option, on the last option Deactivate your account click on edit. Then click on Deactivate your account option and enter your password to continue the step. When you enter your password you must have to give reason for leaving your Facebook account. As you can see on the Picture.


Then click on Deactivate option, a small window screen in front on your screen(see below), click on Deactivate now.


When you do above step you account has been deactivate but you can easily again login.


To delete account permanently again login your account and paste the Url on new tab (Click Here) when you click on this link Facebook ask to delete your account permanently.

Then put your password and click on it. Now click on delete my account. Now your account delete permanently.
(Note:-  your account has been deactivated permanently within 14 days. So don’t login your account within next 14 days)


How to delete Facebook fan page

To delete your Facebook fan page you must have admin on this page. If you are not an admin on this page you can’t delete Facebook fan page. To delete Facebook fan page it is a very simple or easy method. 

So Let’s start how to delete Facebook fan page.

First open your Facebook fan page and go to setting option. And go to last option Remove Page and click on it. As you can see on the Pictures.


When you do step which is displayed on above image then you receive a message to confirm delete your Page option click on it. Now your page delete successfully.


In this tutorial you have learned how to delete Facebook fan page or account permanently. If you have any query comment below and if you like this post doesn’t forget to share. 

(Note:-  your page has been deactivated permanently within 14 days. So don’t cancel your page request within next 14 days).

Friday, 11 November 2016

How to change the Facebook and other social sites Colors, Text easily.


Hello everyone, I am back with some new interesting trick. I know you some times you thought that if you can change the your name in color, make it large and more so here is the best tricks for you people.

So let,s get start.

My favorite color is blue. But i wanna do something new. I thought how i can change the background color of the popular social media website. Like Facebook, Twitter and many other website. Then I research on it. After some time I found the best way to change the background color or text in Facebook or Twitter. This is very simple Process to change the background color or text. I hope that will you really enjoy this.

1-  Fabulous is the best way to change the background color or many more.         Fabulous is an extension that allows the user to change the background color, text and many more. 

2-  First of all you have to open your Google Chrome web store and type Fabulous. Click Here 

3-  Mark the check Box in Extension.

4-  Select the Extension and add the chrome.


5-  You have to add the extension in your chrome.

6-  Now open your Facebook and login in your account.


7- Open your Fabulous extension and allow the permission to Facebook or Twitter.


8-  Now you can change the background color and text color, font color and many more as you want.


This is a simple way to change the Facebook or other social media background. You can change your text, cursor, edge, ad block, photo zoom and many more which is given in this extension.

Note:- 
The background of the popular site is only displayed on your desktop. This extension never displayed publicly. No one see your change background on other side. I hope you like this method. Please don’t forget to share.

All done enjoy!!

Gmail Tricks that you have to really know


Hey Friends, Today I will teach you some Tips and Tricks about Gmail Account. In this tutorial I will tell you some basic and interesting tips and tricks related Gmail Account. It is a free email service. Gmail email service provided by Google. This tutorial help those people who want to know some basic knowledge or tips and tricks about Gmail email service.

So lets get Started.

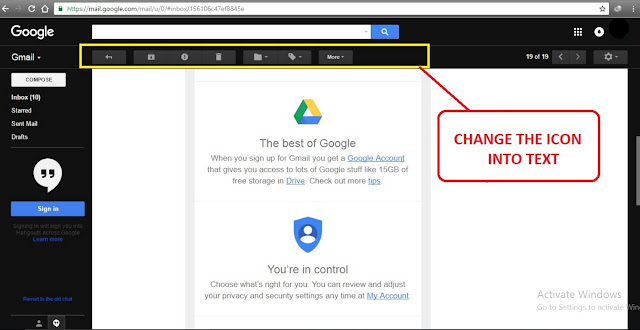
1- CHANGE THE ICON INTO TEXT


To change the icon into text you must have to login in your Gmail account and follow the instruction as given below.

1- Go to the setting, and select the option of setting again.
2- Go to general tab
3- And do step which is displayed as given below.


2- HOW TO USE MULTIPLE STAR IN GMAIL ACCOUNT.


Suppose you have to read a important message and you can’t find the message then you have to use multiple color star in Gmail account to easy find the message or stuff.

1-  Go to the setting, and select the option of setting again.
2-  Go to general tab
3-  And do step which is displayed as given below.
4-  You have to drag the star IN USE row and you have to save the option now           you can use the star in gmail message.
5-  The starts rotate in the order as you set in the general setting.


3- HOW TO HIDE OR SHOW INBOX MANAGEMENT LABEL IN GMAIL


Hide or Show inbox management Label is very important feature in Gmail account. You must have to use this option in Gmail. Let’s start to hide or show inbox management label in Gmail.

1- Go to the setting, and select the option of setting again
2- Go to Labels tab.
3- Click on hide/show button to hide or show labels.

4- HOW TO VIEW EMAIL MESSAGE BESIDES EMAIL

If you want to read your mail right next to your list of conversations, making mail reading faster. So you have to use Preview pane option to show your list of conversation and also preview of this mail. Let’s start to enable preview pane.


Now you can read the mail right next to your list conversation, without changing the tabs. You can also see the preview of mail in vertically and horizontally. Preview pane is best for official use, It save your time.


In this post you have learn some gmail tips and tricks. if you have found any mistake or doubt then let me know through your comment. and if you like this post don't forget to share.
Next tutorial we will discuss some new or interesting tips related to Gmail.

All Done!!

Thursday, 10 November 2016

How to generate exceptions in virtual constructors

It is possible that exceptions might raise in a constructor or destructors. If an exception is raised in a constructor, memory might be allocated to some data members and might not be allocated for others. This might lead to memory leakage problem as the program stops and the memory for data members stays alive in the RAM.


Similarly, when an exception is raised in a destructor, memory might not be deallocated which may again lead to memory leakage problem. So, it is better to provide exception handling within the constructor and destructor to avoid such problems. Following program demonstrates handling exceptions in a constructor and destructor:

#include<iostream>

using namespace std;

class Divide

{

private:

int *x;

int *y;

public:

Divide()

{

x = new int();

y = new int();

cout<<“Enter two numbers: “;

cin>>*x>>*y;

try

{

if(*y == 0)

{

throw *x;

}

}

catch(int)

{

delete x;

delete y;

cout<<“Second number cannot be zero!”<<endl;

throw;

}

}

~Divide()

{

try

{

delete x;

delete y;

}

catch(...)

{

cout<<“Error while deallocating memory”<<endl;

}

}

float division()

{

return (float)*x / *y;

}

};

int main()

{

try

{

Divide d;

float res = d.division();

cout<<“Result of division is: “<<res;

}

catch(...)

{

cout<<“Unkown exception!”<<endl;

}

return 0;

}

Input and output for the above program is asfollows:

Enter two numbers: 5 0

Second number cannot be zero!

Unkown exception!


Advantages of Exception Handling


Following are the advantages of exception handling:

Exception handling helps programmers to create reliable systems.Exception handling separates the exception handling code from the main logic of program.Exceptions can be handled outside of the regular code by throwing the exceptions from a function definition or by re-throwing an exception.Functions can handle only the exceptions they choose i.e., a function can throw many exceptions, but may choose handle only some of them.

A program with exception handling will not stop abruptly. It terminates gracefully by giving appropriate message.

Take you time to comment on this article.

How to work with virtual constructors and destructors in C++

C++ allows programmers to create virtual destructors. But, it doesn’t allow virtual constructors to be created because of various reasons. To know why a virtual destructor is needed, consider the following program:

#include <iostream>

using namespace std;

class A

{

public:

A()

{

cout<<“A’s constructor”<<endl;

}

~A()

{

cout<<“A’s destructor”<<endl;

}

};

class B : public A

{

public:

B()

{

cout<<“B’s constructor”<<endl;

}

~B()

{

cout<<“B’s destructor”<<endl;

}

};

int main()

{

A *bptr = new B();

delete bptr;

return 0;

}

Output for the above program is as follows:

A‘s constructor

B’s constructor

A‘s destructor


From the above output you can see that derived class destructor didn’t execute. This might lead to problems like memory leakage. To avoid such problems we make destructor in base class as virtual destructor.


Virtual destructor instructor ensures that the derived class destructor is executed. To create a virtual destructor, precede the destructor definition with virtualkeyword. Following program demonstrates a virtual destructor:

#include <iostream>

using namespace std;

class A

{

public:

A()

{

cout<<“A’s constructor”<<endl;

}

virtual ~A()

{

cout<<“A’s destructor”<<endl;

}

};

class B : public A

{

public:

B()

{

cout<<“B’s constructor”<<endl;

}

~B()

{

cout<<“B’s destructor”<<endl;

}

};

int main()

{

A *bptr = new B();

delete bptr;

return 0;

}

Output for the above program is as follows:

A‘s constructor

B’s constructor

B‘s destructor

A’s destructor


Now you can see that derived class constructor is also executed.


Advantages and Disadvantages of Inheritance


Advantages of inheritance are as follows:

Inheritance promotes reusability. When a class inherits or derives another class, it can access all the functionality of inherited class.Reusability enhanced reliability. The base class code will be already tested and debugged.As the existing code is reused, it leads to less development and maintenance costs.Inheritance makes the sub classes follow a standard interface.Inheritance helps to reduce code redundancy and supports code extensibility.Inheritance facilitates creation of class libraries.


Disadvantages of inheritance are as follows:

Inherited functions work slower than normal function as there is indirection.Improper use of inheritance may lead to wrong solutions.Often, data members in the base class are left unused which may lead to memory wastage.Inheritance increases the coupling between base class and derived class. A change in base class will affect all the child classes.

Take your time to comment on this article.

WAFNinja – A Tool To Bypass WAF

WAFNinja is a CLI tool written in Python. It is the best tool for penetration testers to bypass a WAF by automating steps necessary for bypassing input validation. The tool was created with the objective to be easily extendable, simple to use and usable in a team environment. Many payloads and fuzzing strings, which are stored in a local database file come shipped with the tool.

WAFNinja supports HTTP connections, GET and POST requests and the use of Cookies in order to access pages restricted to authenticated users. Also, an intercepting proxy can be set up.


Using Command:

wafninja.py [-h] [-v] {fuzz, bypass, insert-fuzz, insert-bypass, set-db} ...

Example:

Fuzz:

python wafninja.py fuzz -u "http://www.target.com/index.php?id=FUZZ" -c "phpsessid=value" -t xss -o output.html


Bypass:

python wafninja.py bypass -u "http://www.target.com/index.php" -p "Name=PAYLOAD&amp;Submit=Submit" -c "phpsessid=value" -t xss -o output.html

Insert-Fuzz:

python wafninja.py insert-fuzz -i select -e select -t sql

positional arguments: {fuzz, bypass, insert-fuzz, insert-bypass, set-db}

Which function do you want to use? fuzz check which symbols and keywords are allowed by the WAF. bypass sends payloads from the database to the target. insert-fuzz add a fuzzing string insert-bypass add a payload to the bypass list set-db use another database file. Useful to share the same database with others. optional arguments: -h, --help show this help message and exit -v, --version show program's version number and exit

Download WAFNinja